While Macs are generally able to play a wide range of video formats, being able to switch videos from one format to another can still be useful. It will enable you to compress videos using newer formats or ensure they are compatible with other devices and platforms that you may want to use to watch certain videos.
Although there are numerous video converters that can run on macOS, none is quite like Movavi Video Converter for Mac. Not only does it support practically any and all video formats that you may require, but more importantly it will make converting videos between formats a piece of cake.

How to Convert Video Formats on a Mac
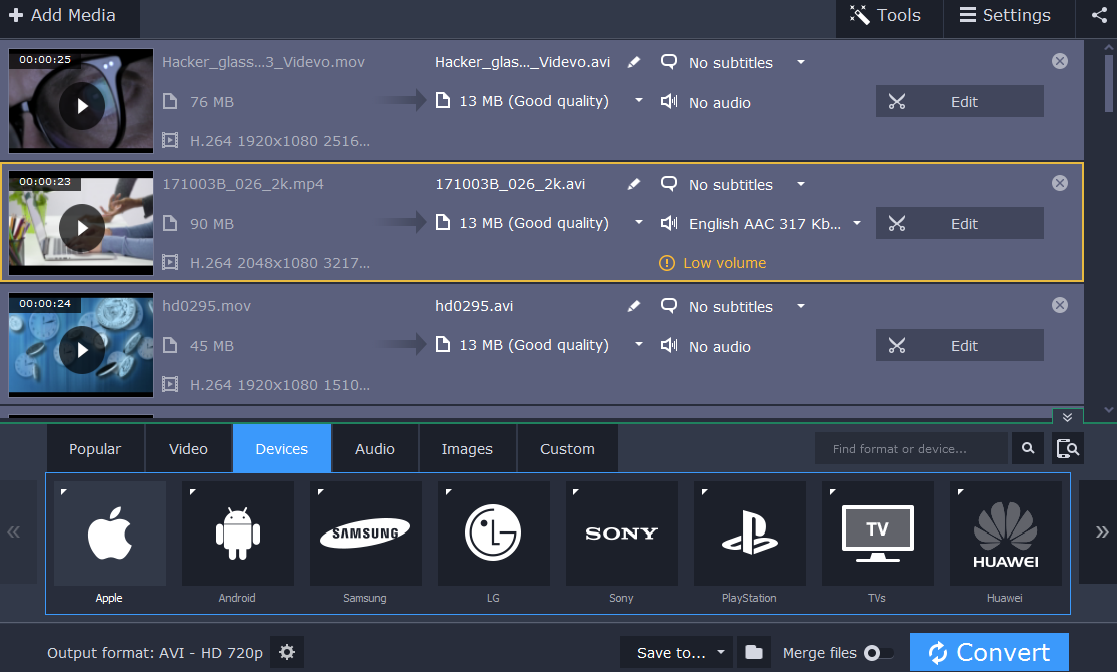
Assuming you’ve already downloaded and installed Movavi Video Converter for Mac, you can launch it and start to set it up to convert a video. The first thing you’ll need to do is click on the ‘Add Media’ button then select ‘Add Video’ so that you are able to add the video that you want to convert. Another way to add videos is to drag and drop the video file into the working area.
After the video you’d like to convert has been added, you should select a format. The ‘Video’ tab in the lower part of Movavi Video Converter for Mac’s interface will let you select presets for various categories of formats, or alternatively, you could select a preset for a device or platform under the ‘Devices’ tab.
If you opt to use a preset for a specific device or platform, Movavi Video Converter for Mac will automatically use the best possible video format and settings – rather than forcing you to figure out which one to use. That should make converting videos for a certain device or platform much easier, especially if you aren’t that familiar with video formats, to begin with.

In any case, after you’ve selected a preset, you can set the destination folder by clicking on the ‘folder’ icon beside the ‘Save to’ field. Once you do only one step remains and you can click on the ‘Convert’ button so that Movavi Video Converter for Mac begins to convert your video.
As much as Movavi Video Converter for Mac does focus on converting videos, it is able to convert images and audio files. That is something that you can take advantage of to cross-convert media files and extract audio tracks from videos, create animated GIFs, or grab screenshots.
If you want you could explore the editing tools in Movavi Video Converter for Mac as well that can help you to improve and prepare your media files. It is able to cut and join videos, improve their quality, add captions, and more.
All in all Movavi Video Converter for Mac is a Mac video converter that really has no equal, both in terms of how easy it is to convert videos with its help – as well as its other features. Once you try it out, odds are you’ll see exactly how useful it can be.
Although there are numerous video converters that can run on macOS, none is quite like Movavi Video Converter for Mac. Not only does it support practically any and all video formats that you may require, but more importantly it will make converting videos between formats a piece of cake.

How to Convert Video Formats on a Mac
Assuming you’ve already downloaded and installed Movavi Video Converter for Mac, you can launch it and start to set it up to convert a video. The first thing you’ll need to do is click on the ‘Add Media’ button then select ‘Add Video’ so that you are able to add the video that you want to convert. Another way to add videos is to drag and drop the video file into the working area.
After the video you’d like to convert has been added, you should select a format. The ‘Video’ tab in the lower part of Movavi Video Converter for Mac’s interface will let you select presets for various categories of formats, or alternatively, you could select a preset for a device or platform under the ‘Devices’ tab.
If you opt to use a preset for a specific device or platform, Movavi Video Converter for Mac will automatically use the best possible video format and settings – rather than forcing you to figure out which one to use. That should make converting videos for a certain device or platform much easier, especially if you aren’t that familiar with video formats, to begin with.

In any case, after you’ve selected a preset, you can set the destination folder by clicking on the ‘folder’ icon beside the ‘Save to’ field. Once you do only one step remains and you can click on the ‘Convert’ button so that Movavi Video Converter for Mac begins to convert your video.
As much as Movavi Video Converter for Mac does focus on converting videos, it is able to convert images and audio files. That is something that you can take advantage of to cross-convert media files and extract audio tracks from videos, create animated GIFs, or grab screenshots.
If you want you could explore the editing tools in Movavi Video Converter for Mac as well that can help you to improve and prepare your media files. It is able to cut and join videos, improve their quality, add captions, and more.
All in all Movavi Video Converter for Mac is a Mac video converter that really has no equal, both in terms of how easy it is to convert videos with its help – as well as its other features. Once you try it out, odds are you’ll see exactly how useful it can be.
